Add the Controls | Show the Userform | Assign the Macros | Test the Userform
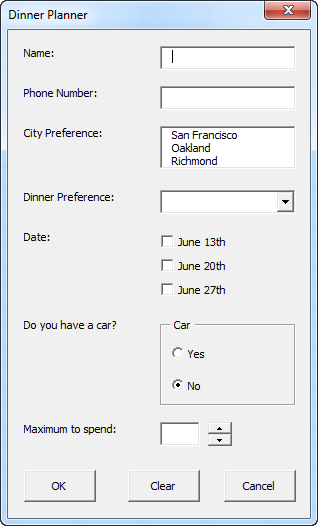
This chapter teaches you how to create an Excel VBA Userform. The Userform we are going to create looks as follows:
Add the Controls
To add the controls to the Userform, execute the following steps.
1. Open the Visual Basic Editor. If the Project Explorer is not visible, click View, Project Explorer.
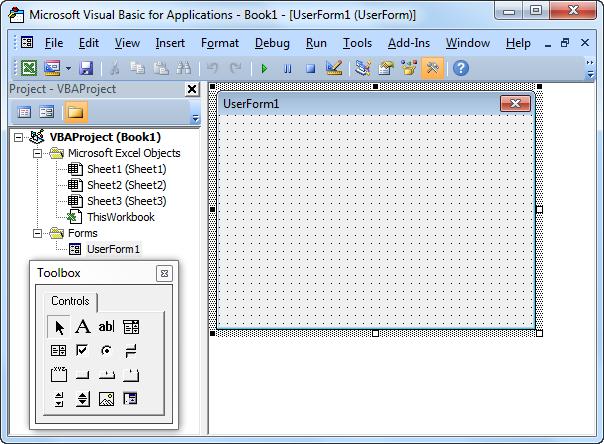
2. Click Insert, Userform. If the Toolbox does not appear automatically, click View, Toolbox. Your screen should be set up as below.
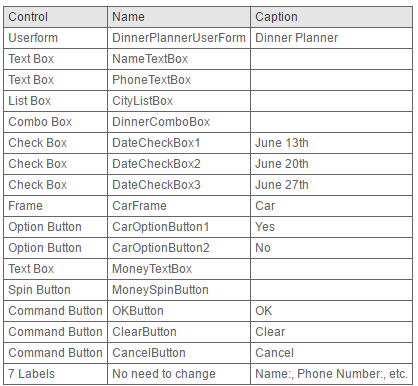
3. Add the controls listed in the table below. Once this has been completed, the result should be consistent with the picture of the Userform shown earlier. For example, create a text box control by clicking on TextBox from the Toolbox. Next, you can drag a text box on the Userform. When you arrive at the Car frame, remember to draw this frame first before you place the two option buttons in it.
4. Change the names and captions of the controls according to the table below. Names are used in the Excel VBA code. Captions are those that appear on your screen. It is good practice to change the names of controls. This will make your code easier to read. To change the names and captions of the controls, click View, Properties Window and click on each control.
Note: a combo box is a drop-down list from where a user can select an item or fill in his/her own choice. Only one of the option buttons can be selected.
Show the Userform
To show the Userform, place a command button on your worksheet and add the following code line:
Private Sub CommandButton1_Click()
DinnerPlannerUserForm.Show
End Sub
We are now going to create the Sub UserForm_Initialize. When you use the Show method for the Userform, this sub will automatically be executed.
1. Open the Visual Basic Editor.
2. In the Project Explorer, right click on DinnerPlannerUserForm and then click View Code.
3. Choose Userform from the left drop-down list. Choose Initialize from the right drop-down list.
4. Add the following code lines:
Private Sub UserForm_Initialize()
‘Empty NameTextBox
NameTextBox.Value = “”‘Empty PhoneTextBox
PhoneTextBox.Value = “”‘Empty CityListBox
CityListBox.Clear‘Fill CityListBox
With CityListBox
.AddItem “San Francisco”
.AddItem “Oakland”
.AddItem “Richmond”
End With‘Empty DinnerComboBox
DinnerComboBox.Clear‘Fill DinnerComboBox
With DinnerComboBox
.AddItem “Italian”
.AddItem “Chinese”
.AddItem “Frites and Meat”
End With‘Uncheck DataCheckBoxes
DateCheckBox1.Value = False
DateCheckBox2.Value = False
DateCheckBox3.Value = False‘Set no car as default
CarOptionButton2.Value = True‘Empty MoneyTextBox
MoneyTextBox.Value = “”‘Set Focus on NameTextBox
NameTextBox.SetFocusEnd Sub
Explanation: text boxes are emptied, list boxes and combo boxes are filled, check boxes are unchecked, etc.
Assign the Macros
We have now created the first part of the Userform. Although it looks neat already, nothing will happen yet when we click the command buttons on the Userform.
1. Open the Visual Basic Editor.
2. In the Project Explorer, double click on DinnerPlannerUserForm.
3. Double click on the Money spin button.
4. Add the following code line:
Private Sub MoneySpinButton_Change()
MoneyTextBox.Text = MoneySpinButton.Value
End Sub
Explanation: this code line updates the text box when you use the spin button.
5. Double click on the OK button.
6. Add the following code lines:
Private Sub OKButton_Click()
Dim emptyRow As Long
‘Make Sheet1 active
Sheet1.Activate‘Determine emptyRow
emptyRow = WorksheetFunction.CountA(Range(“A:A”)) + 1‘Transfer information
Cells(emptyRow, 1).Value = NameTextBox.Value
Cells(emptyRow, 2).Value = PhoneTextBox.Value
Cells(emptyRow, 3).Value = CityListBox.Value
Cells(emptyRow, 4).Value = DinnerComboBox.ValueIf DateCheckBox1.Value = True Then Cells(emptyRow, 5).Value = DateCheckBox1.Caption
If DateCheckBox2.Value = True Then Cells(emptyRow, 5).Value = Cells(emptyRow, 5).Value & ” ” & DateCheckBox2.Caption
If DateCheckBox3.Value = True Then Cells(emptyRow, 5).Value = Cells(emptyRow, 5).Value & ” ” & DateCheckBox3.Caption
If CarOptionButton1.Value = True Then
Cells(emptyRow, 6).Value = “Yes”
Else
Cells(emptyRow, 6).Value = “No”
End IfCells(emptyRow, 7).Value = MoneyTextBox.Value
End Sub
Explanation: first, we activate Sheet1. Next, we determine emptyRow. The variable emptyRow is the first empty row and increases every time a record is added. Finally, we transfer the information from the Userform to the specific columns of emptyRow.
7. Double click on the Clear button.
8. Add the following code line:
Private Sub ClearButton_Click()
Call UserForm_Initialize
End Sub
Explanation: this code line calls the Sub UserForm_Initialize when you click on the Clear button.
9. Double click on the Cancel Button.
10. Add the following code line:
Private Sub CancelButton_Click()
Unload Me
End Sub
Explanation: this code line closes the Userform when you click on the Cancel button.
Test the Userform
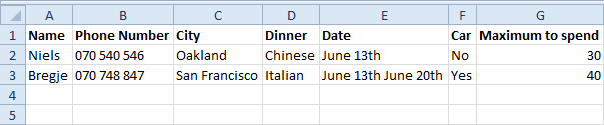
Exit the Visual Basic Editor, enter the labels shown below into row 1 and test the Userform.
Result:
learn more about Userform, See below;
- Interactive Userform
- Userform with Multiple Pages
- Controls Collection
- Loop through Controls
- Multicolumn Combo Box
- Multiple List Box Selections
- Progress Indicator
- Currency Converter
- Userform and Ranges